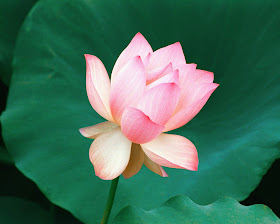
Have you ever curious how professional graphic can cut beautifully an object out from the background? Basically they use "Pen" tool 
Anyway, we now presently have many ways to cut an object out from the background that easier than Pen tool, but this tool is the basic one that most of graphic designer might use. So I will teach you how to use the Pen tool to cut and object, which we will use lotus flower in this tutorial.


Anyway, we now presently have many ways to cut an object out from the background that easier than Pen tool, but this tool is the basic one that most of graphic designer might use. So I will teach you how to use the Pen tool to cut and object, which we will use lotus flower in this tutorial.

After you cut eat, I also will teach you how to create nice background like this below.
Go to select "Pen Tool".
Zoom in to same view as my picture below. Normally, graphic designer might just pree"Ctrl + space bar" to zoom in. You will notice your cursor is changed to be magnifier symbol, zoom until your view is the same as below. After you leave your finger from pressing zoom-in hotkey, the symbol is turned back to Pen. Then, click on the same position as below. This is your starting point.
Go to click to second point, then drag until the Pen's arm is shown. Try to control the arm's curve along with lotus shape.
Press "Alt", and keep holding, then left click on the second point you have made. Notice that one arm has been eliminated.
Step to click the third point, drag it until the arms occurred. Control the curve along with the lotus shape.
Do the same thing before, "Alt + left click" to eliminate arms.
Go on...Go on...Keep Go on..!!!
Now you have reached to the starting point.
Press "Ctrl+Enter" to change from path to dash line, this is the selection line of the lotus flower.
Press "Ctrl+C" to copy the flower. Now your lotus has been recorded in your memory. After that press "Ctrl+V" to paste lotus on the same position. You won't see anything change until you see one layer occurred over the background layer. That is the cut lotus on the new layer.
Go to select background layer at your layer box. Select blue color. Make sure that two small boxes of color at the bottom of toolbox, the blue color is the one at the top left. Press "Atl+Enter" to fill blue color entire background area. This step is not necessary. I just want to show you the lotus has been really cut from background.
After you cut and paste the object, on the blue layer, You can retouch shade to make it looks interesting, which I used Burn Tool. Right click on the canvas, then adjust your brush size, this case, I quite used large brush, which I scrolled a bit far to the right. Don't forget to adjust "Range" at the top below the main menu, select " Midtone", this set can make the darker shade looks more contrast. Then use the Burn tool to brush the area that around the Lotus.

Graphic Retouch Tutorial 3 Slideshow: Yourfriendbryan’s trip from กรุงเทพมหานคร, ไทย to was created by TripAdvisor. See another ไทย slideshow. Create your own stunning free slideshow from your travel photos.


No comments:
Post a Comment
I'm so glad if you leave your comment about my works here...Thank you.